
![Installing Remix OS in PC/LapTop [2017]](/wp-content/uploads/2017/02/Installing-Remix-OS-in-PC-LapTop-tricksUniversity-2017.png "Installing Remix OS in PC/LapTop [2017]")
This Post will explain how to Install Remix OS in PC. This OS comes with certain basic Android features adding some missing functions that are present for Mac and Windows users. TricksUniversity 2017
So I guess this is my first post in TricksUniversity. Since this is my first post i will introduce myself before getting started with the post . I am Sri Hari who is a student living in Tamil Nadu and speaks 6 different languages and some programming languages ( C# , C , C++ , VB ) . I am a Senior Member in the XDA-Developers Forums . You should check them out as it’s a platform for Android enthusiasts to learn , develop and contribute for Android.So Let’s get into the post
Introduction :
As we all know , We can use Android Emulators to use Android in a Virtual Environment . Our Guest Author Kathy Mitchell also enlisted the Top 5 Best Android Emulators for PC in her post . But ever wondered you can install it directly into your Hard Disk. And we have 2 methods to do that … . The Easy Way and The Tough Way .I will teach you guys how to do the easy way today….
The Easy Way – Remix OS :
Unless you’re an Android Developer or an member in XDA-Developers , it’s unlikely you heard about this super cool OS – Remix OS . It’s an Modified Version of the Android x86 which we will be looking later . Remix OS is based on Android . It’s aimed for PCs and can function just like a normal PC OS . You hardly can’t find the fact it is based on Android. The Notable Features of Remix OS are
-
Ability to Window Apps
- Yes you heard it right , Though being Android , Remix OS gives you the ability to use apps just like you do in Windows . You can Crop , Minimize and Maximize Apps
-
Multi-Tasking
- It also enables you to use multiple apps and also multiple instances of a App ( i.e A File Manager).
-
Essentials Pre-Installed
- It contains all the Essential Apps to begin using Remix OS .It has Play Store , Facebook and many apps pre-installed . Unlike Android or others , You have all your essential apps , drives pre-installed . That’s a bonus when you’re noob when dealing with sensitive driver installations 😉
-
Also has a Start Button
- It even has a Windows styled Start Button to play with . With many Possibilities and endless Potential to develop , Remix OS might be your dream come true.
Installation :
Before installing any OS we need to first give it some separate partition to install . To do that let’s by powering up your Control Panel . With that done . Click on Device Manager and click on Disk Managment which is in the left of your screen.
In Disk Management’s Graphical view, right-click an unallocated or free area, and then click New Simple Volume. This starts the New Simple Volume Wizard. (Note: If you need to create unallocated space, see the Tip Easily Shrink a Volume on a Windows 7 Disk for information on how to do this.)

- Read the Welcome page and then click Next.
- The Specify Volume Size page specifies the minimum and maximum size for the volume in megabytes and lets you size the volume within these limits. Size the partition in megabytes using the Simple Volume Size field then click Next.
 On the Assign Drive Letter Or Path page, specify whether you want to assign a drive letter or path and then click Next. The available options are as follows
-
 Part 2: Assign The Following Drive Letter Select an available drive letter in the selection list provided.
 -
By default, Windows 7 selects the lowest available drive letter and excludes reserved drive letters as well as those assigned to local disks or network drives.
Mount In The Following Empty NTFS Folder Choose this option to mount the partition in an empty NTFS folder. You must then type the path to an existing folder or click Browse to search for or create a folder to use.
Do Not Assign A Drive Letter Or Drive Path Choose this option if you want to create the partition without assigning a drive letter or path. Later, if you want the partition to be available for storage, you can assign a drive letter or path at that time. - Use the Format Partition page to determine whether and how the volume should be formatted. If you want to format the volume, choose Format This Volume With The Following Settings, and then configure the following options:
-
 Part 3: File System
 -
Set the file system type as FAT, FAT32, or NTFS. NTFS is selected by default in most cases. If you create a file system as FAT or FAT32, you can later convert it to NTFS by using the Convert utility. You can’t, however, convert NTFS partitions to FAT or FAT32.
Allocation Unit Size Sets the cluster size for the file system. This is the basic unit in which disk space is allocated. The default allocation unit size is based on the size of the volume and, by default, is set dynamically prior to formatting. To override this feature, you can set the allocation unit size to a specific value. If you use many small files, you might want to use a smaller cluster size, such as 512 or 1,024 bytes. With these settings, small files use less disk space.
Volume Label Sets a text label for the partition. This label is the partition’s volume name and by default is set to New Volume. You can change the volume label at any time by right-clicking the volume in Windows Explorer, choosing Properties, and typing a new value in the Label field provided on the General tab.
Perform A Quick Format Tells Windows 7 to format without checking the partition for errors. With large partitions, this option can save you a few minutes. However, it’s usually better to check for errors, which enables Disk Management to mark bad sectors on the disk and lock them out.
Enable File And Folder Compression Turns on compression for the disk. Built-in compression is available only for NTFS. Under NTFS, compression is transparent to users and compressed files can be accessed just like regular files. If you select this option, files and directories on this drive are compressed automatically. - Click Next, confirm your options, and then click Finish
Now thats done.Let’s Grab the Required Downloads
Download :
Let’s Download it by going to their Downloads website.We would have 5 different variants of Remix OS
Download Remix OS
So to give a idea which file you have to download , I will list them below
- Download Remix OS 32-bit Package (Legacy Only) : It’s based on 32bit-Architecture Devices and for PCs which sport a 32bit Processor and support only Legacy mode.
- Remix OS RemixOS_Player : It’s pretty much like Bluestacks and we don’t need them.
- Download Remix OS for PC 64-bit Package (EFI & Legacy) : It’s based on 64bit-Architecture and for PCs with 64bit-Processor and support both EFI & Legacy modes.
- Remix OS on Pixel C : It is build for Pixel C variants.
- Remix OS on Nexus 9 : It is build for Nexus 9 variants.
Get the specific variant what is targeted for you and go ahead.
Installing Remix OS :
Step 1: Format the USB Drive and Change the Format to FAT32.
Once you’ve successfully downloaded the Remix OS 2.0 and the USB Tool from the above link, format the USB Drive and change the format of the USB Drive to FAT32. This will make the USB empty and in the format which the Remix OS requires.
Disclaimer: Before formatting take the important data’s backup to the HDD so that you don’t lose any important data stored in the USB Drive.
Step 2: Start the Remix OS USB Tool.
The Remix OS Torrent file which you’ve downloaded from the above link doesn’t just have the OS, but it also has a USB Tool. So this tool flashes the OS to the USB drive and make the USB Bootloader.

After starting the tool, you will have to select the ISO file and the drive where you want to install the ISO File. You might think of extracting the ISO file directly to the USB, but that won’t help because this tool also makes the USB bootable.
Step 3: Add the ISO File to the USB Tool & Select the USB Disk on which you will be Installing the Remix OS.
So the Remix OS USB tool has two fields, in one field you are supposed to add the path of the ISO File on your computer system & select the USB disk on which this tool will install the OS.
 Select the ISO file of the Remix OS which you’ve downloaded from the Step 1 and the USB Disk where you want to install the Remix OS 2.0. Once done, The Remix OS USB tool will begin it’s working, It will start copying files & writing the Bootloader to the USB Drive.

This process might take time, depending on the read and write speed of your computer system, It is recommended to stop doing other tasks while these files are being copied, because on slow computer systems, you might notice lags. Once it is completed, go ahead and follow the next step.
Step 4: Reboot your Computer System & Follow the instructions.
Depending on your BIOS, the Boot menu keys are different, so make a Google search “Laptop Brand Model Shortcut for Boot Menu” for the Key combinations to get into the Boot menu during the start.
Now Power on your computer system and press the key combinations to see the Boot menu and you will see a list of devices from which you can boot, You will have to select your USB Drive.

Select the USB Drive which has the “Remix OS 2.0 Installed in it”. Once done, it will boot up and you will see a blue screen showing two ways of using it i.e. Guest mode and Resident Mode. But in case you aren’t able to boot up and your existing Windows OS gets booted then you will have to change your BIOS Boot mode to Legacy and Follow the steps listed above again.

If you’ve seen this blue screen then you are on the right path and you will soon see the Remix working on your Computer System or Laptop.
Step 5: Select the Mode of Installation – Guest Mode or Resident Mode.
The Remix OS 2.0 has two modes of installation, you can use “Guest mode” or “Resident mode”. Guest mode is for the one’s who are willing to test it and are not sure about using the OS again. It won’t store any of your tasks, data nor the app installations. Once you reboot you will lose all the data.

The Resident mode will format the USB which has the live CD on it, But it will save all the details and changes you make to the Remix OS. That’s the reason why it takes 5-15 minutes based on the “System Configuration” and once getting into Resident mode you won’t have to install the Remix OS again and again!
Step 6: Remix OS 2.0 – Begin with Installing the OS.
Now the Remix OS 2.0 is installed, The boot screen with “Remix OS” written on confirms the installation. However, You are just three steps away to start the Remix OS 2.0’s GUI.
1st Step: Selecting the Language for operation:

The Remix OS 2.0 comes with different Languages pre-installed in it, selecting the language will be make the OS run in that particular language. So once you’ve booted into the Remix OS 2.0, the first thing you will see is selecting the language.
2nd Step: Agree to the User Agreement.

Once you’ve selected the language, The User agreement will appear, Depending on the language you’ve selected – the user agreement will appear in that language. I’ve selected English US as the language for operations. Clicking on the Next button will bring you closer to the Last step to see the working Remix OS 2.0 on your Laptop.
3rd Step – Click on Start.
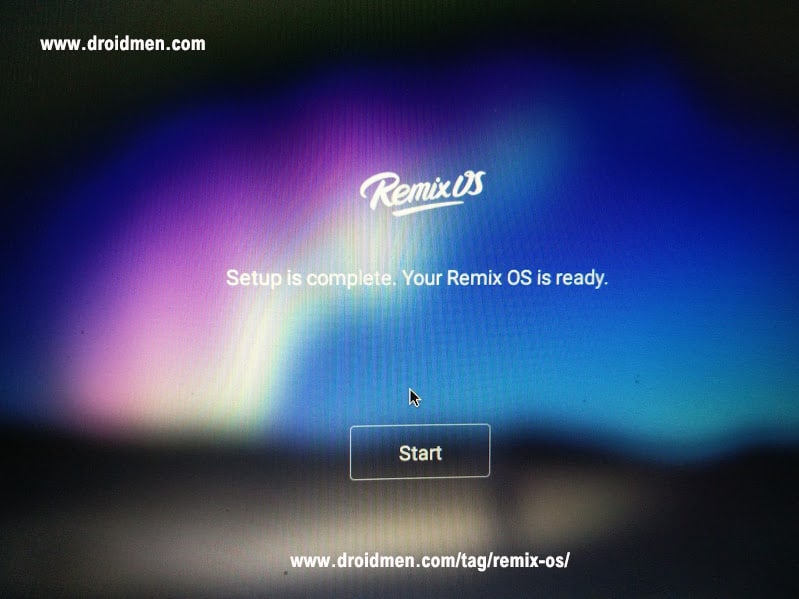
Yes, I agree that this is the most easiest step to do, You just have to click on “Start” and you will see the Remix OS 2.0 Live. I know this is the dumbest step, but we couldn’t avoid it. That’s it once done, you will see the Remix OS 2.0 operating live on your computer system.

Now, you’ve successfully installed the Remix OS 2.0 on your Computer system, Now its time to play around with the OS. Personally I used many apps such as Facebook, WordPress and Google Drive. Even the shortcuts such as Num Lock, Caps Lock, Number Keypad, ALT + Tab, ALT + F4 works fine on the Remix OS 2.0, I didn’t feel that I left Windows 10 OS while using this. Hope you enjoy using this. Faced any problems while installing? Post them here and I’ll solve that problem right away!
Thanks to droidmen.com for some images and references….
I will be posting you the tough way tommorrow guys 😉 ..
COMMENTS